Table of Contents
- What We Are Building
- Architecture
- Part 1: Receiving Emails
- Step 1: Connect Domain with Route 53
- Step 2: Create SES Identities (Domain & Email)
- Step 3: Create S3 Bucket for Inbound Emails
- Step 4: Create IAM Policy and Role for Lambda
- Step 5: Create Lambda Function for Email Forwarding
- Step 6: Configure Lambda Environment Variables
- Step 7: Create Email Receiving Rule
- Step 8: Test Email Receiving
- Part 2: Sending Emails
- Part 3: Operations & Monitoring
- Part 4: Going to Production
- Conclusion
What We Are Building
Have you ever wanted a professional email address like hello@yourdomain.com but didn't want to pay for Google Workspace or Microsoft 365? Or maybe you need to receive emails on your domain and forward them to your Gmail? That's exactly what we're building here.
By the end of this guide, you'll have:
- Inbound emails sent to
you@yourdomain.comautomatically forwarded to your personal Gmail or business email - Outbound emails sent from Gmail that appear to come from
you@yourdomain.comvia SES SMTP - Monitoring with CloudWatch to track any issues
- Cost management with S3 lifecycle rules to keep storage costs minimal
We're using Amazon Simple Email Service (SES) along with a few other AWS services to make this work. The whole setup runs in the SES sandbox by default, which is perfect for testing. When you're ready for production, you can request access from AWS.
Note: This guide assumes you already have an AWS account. If you don't, head over to aws.amazon.com and create one. The free tier covers most of what we're doing here.
Architecture
Here's how the whole system works. When someone sends an email to your domain, it flows through several AWS services before landing in your inbox:
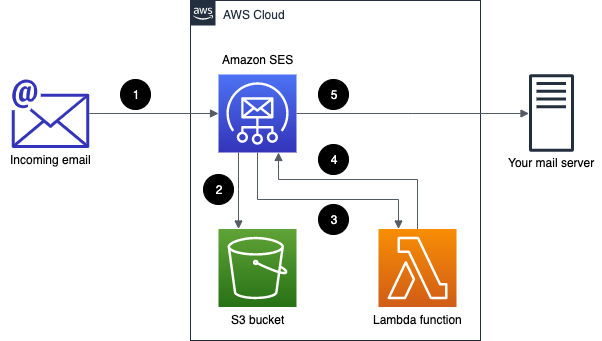
The flow looks like this:
- Someone sends an email to
you@yourdomain.com - Route 53 handles the DNS and routes the email to SES
- SES receives the email and triggers a receipt rule
- S3 stores a copy of the original email
- Lambda picks up the email from S3 and forwards it to your personal address
- SES sends the forwarded email to your Gmail or business email
- CloudWatch logs everything for monitoring
We'll also set up SMTP so you can send emails from Gmail that appear to come from your domain. That's the outbound side.
Part 1: Receiving Emails
This is the main part. We're setting up your domain to receive emails and forward them to your personal email address.
Step 1: Connect Domain with Route 53
First things first, you need a domain connected to Amazon Route 53. If you purchased your domain through AWS, it's already here. If you bought it elsewhere (Namecheap, GoDaddy, etc.), you can either transfer it to Route 53 or update your registrar's nameservers to point to Route 53.
Here's what the Route 53 dashboard looks like. This is where you manage your domains, hosted zones, and DNS records:
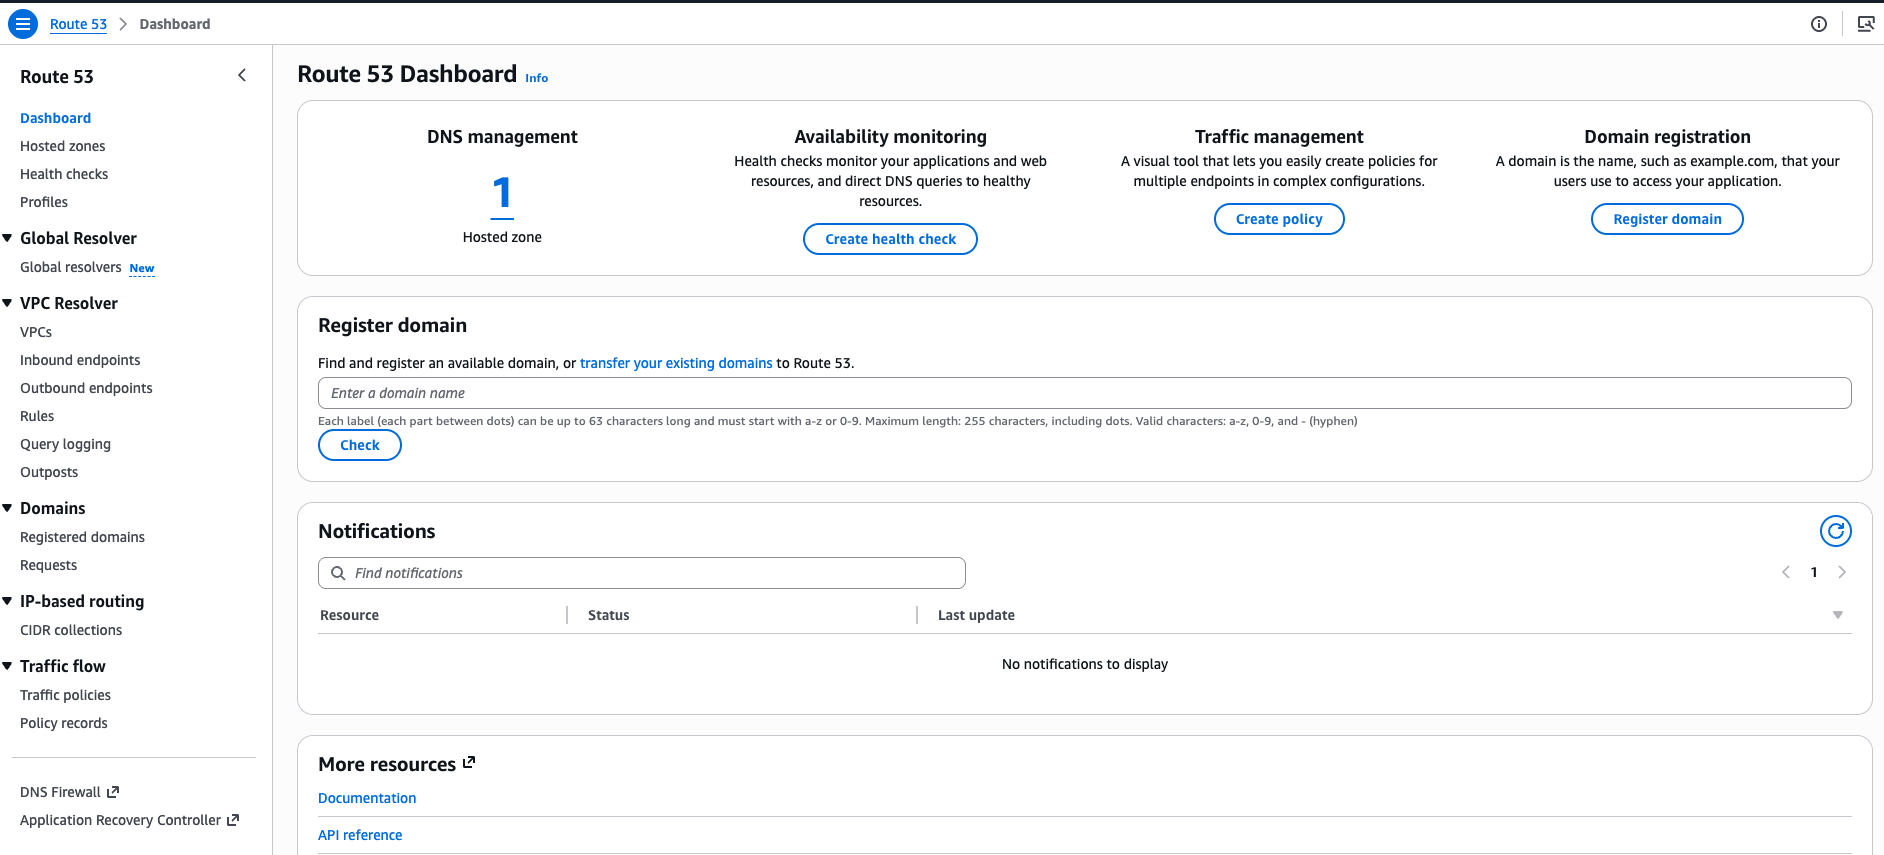
If your domain is already listed in Route 53, you're good to go. If not, you'll need to either register a new domain through Route 53 or transfer your existing domain. The dashboard shows all your registered domains and their DNS status.
Pro tip: Route 53 charges $0.50 per hosted zone per month. If you're just testing, you can use a cheap domain to keep costs down.
Important: Not all AWS regions support email receiving. Before you proceed, check the SES supported regions for email receiving. For this guide, we'll use a region that supports both sending and receiving (e.g., us-east-1, etc.).
Once your domain is in Route 53, move on to Step 2 to connect it with SES.
Step 2: Create SES Identities (Domain & Email)
Now we need to verify your domain and email in SES. Go to the SES console and create a domain identity:
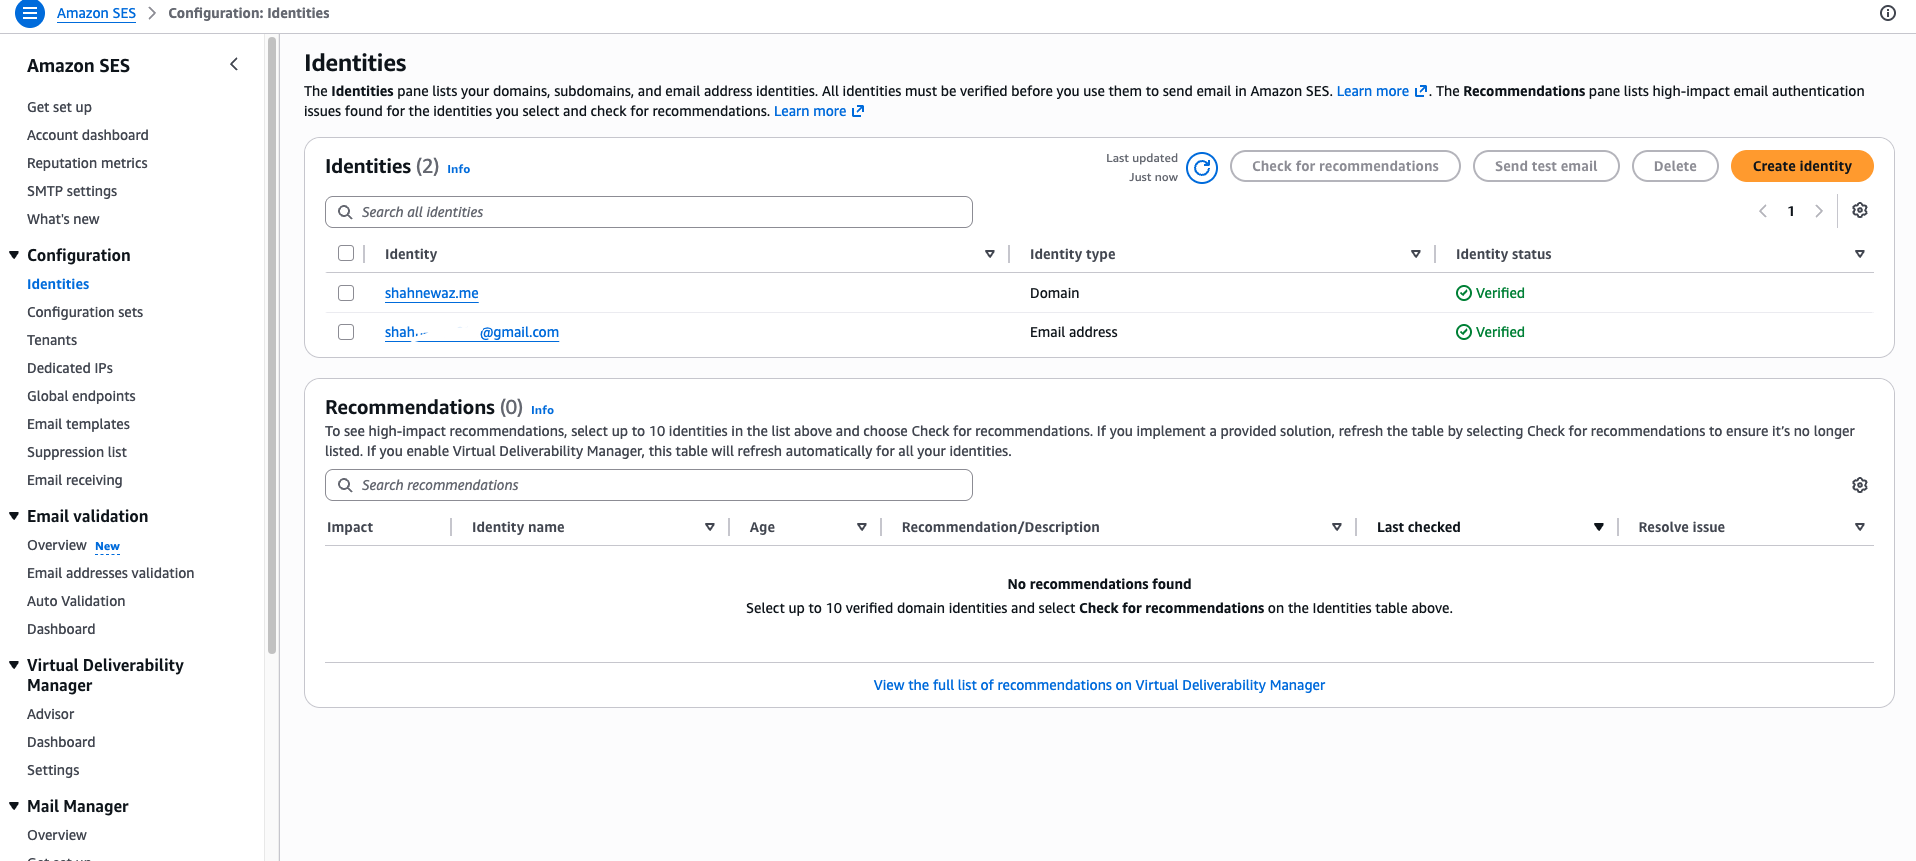
When you create a domain identity in SES, AWS can automatically create the required DNS records in Route 53 if your domain is managed there. This includes:
- DKIM records (CNAME) for email authentication
- Verification record (TXT) to prove domain ownership
- MX record for inbound email routing
The MX record tells other mail servers where to deliver emails for your domain. For SES, it looks like this:
10 inbound-smtp.<your-region>.amazonaws.comReplace <your-region> with your AWS region (e.g., us-east-1). The 10 is the priority value.
Once the DNS records are in place, it can take up to 72 hours for propagation, but it usually happens within a few minutes. You can verify your MX records using MXToolbox — just enter your domain and check if the MX record shows up correctly.
You also need to verify an email identity — your personal email like yourname@gmail.com. This is needed because in sandbox mode, SES only lets you send and receive to verified addresses. So if you want to forward emails to your Gmail, you need to verify that Gmail address too.
When you verify an email, SES sends a confirmation link to that address. Open that email and click the verification link. Once clicked, the email identity is verified and ready to use.
Sandbox limitation: In sandbox mode, you can only send emails to verified identities. That means if someone sends an email to
hello@yourdomain.com, you can forward it to your verified Gmail, but you can't forward it to an unverified email address. We'll cover production access later.
Step 3: Create S3 Bucket for Inbound Emails
Next, we need an S3 bucket to store incoming emails. SES will save a copy of each email here before Lambda picks it up.
Go to the Amazon S3 console and create a new bucket:
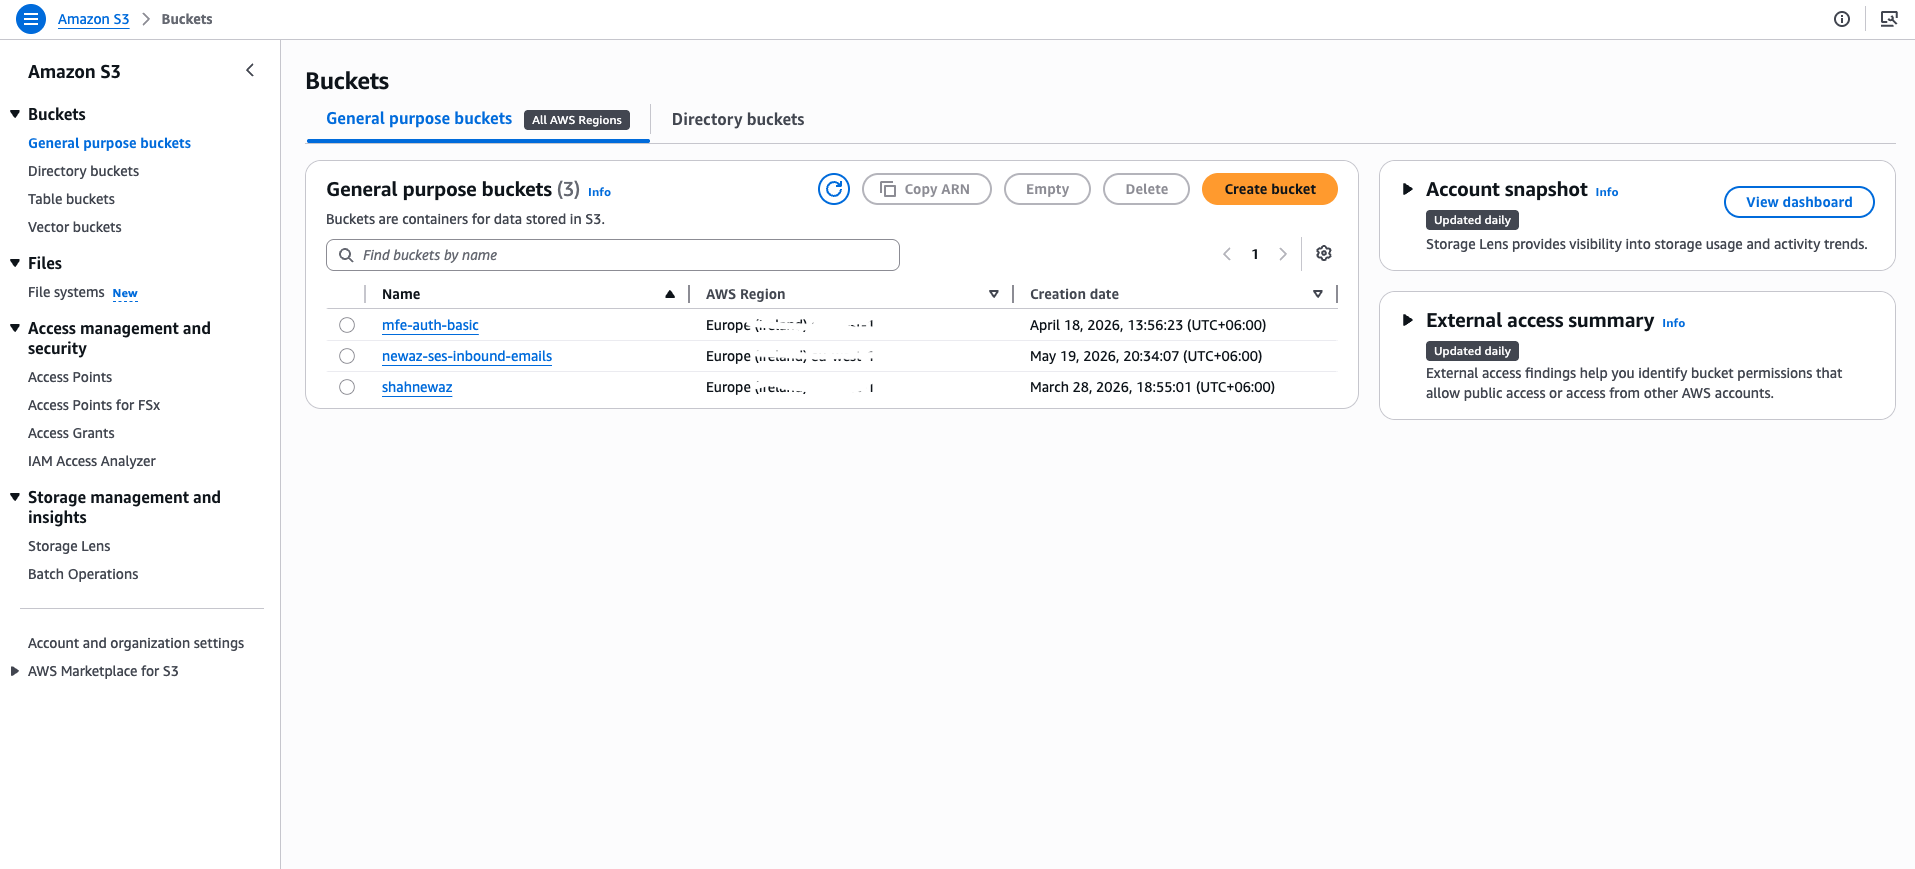
Give your bucket a descriptive name like <s3-bucket-name>. Keep the default settings for now.
Once the bucket is created, go to the Permissions tab and add a bucket policy. This policy allows SES to write emails to your bucket:
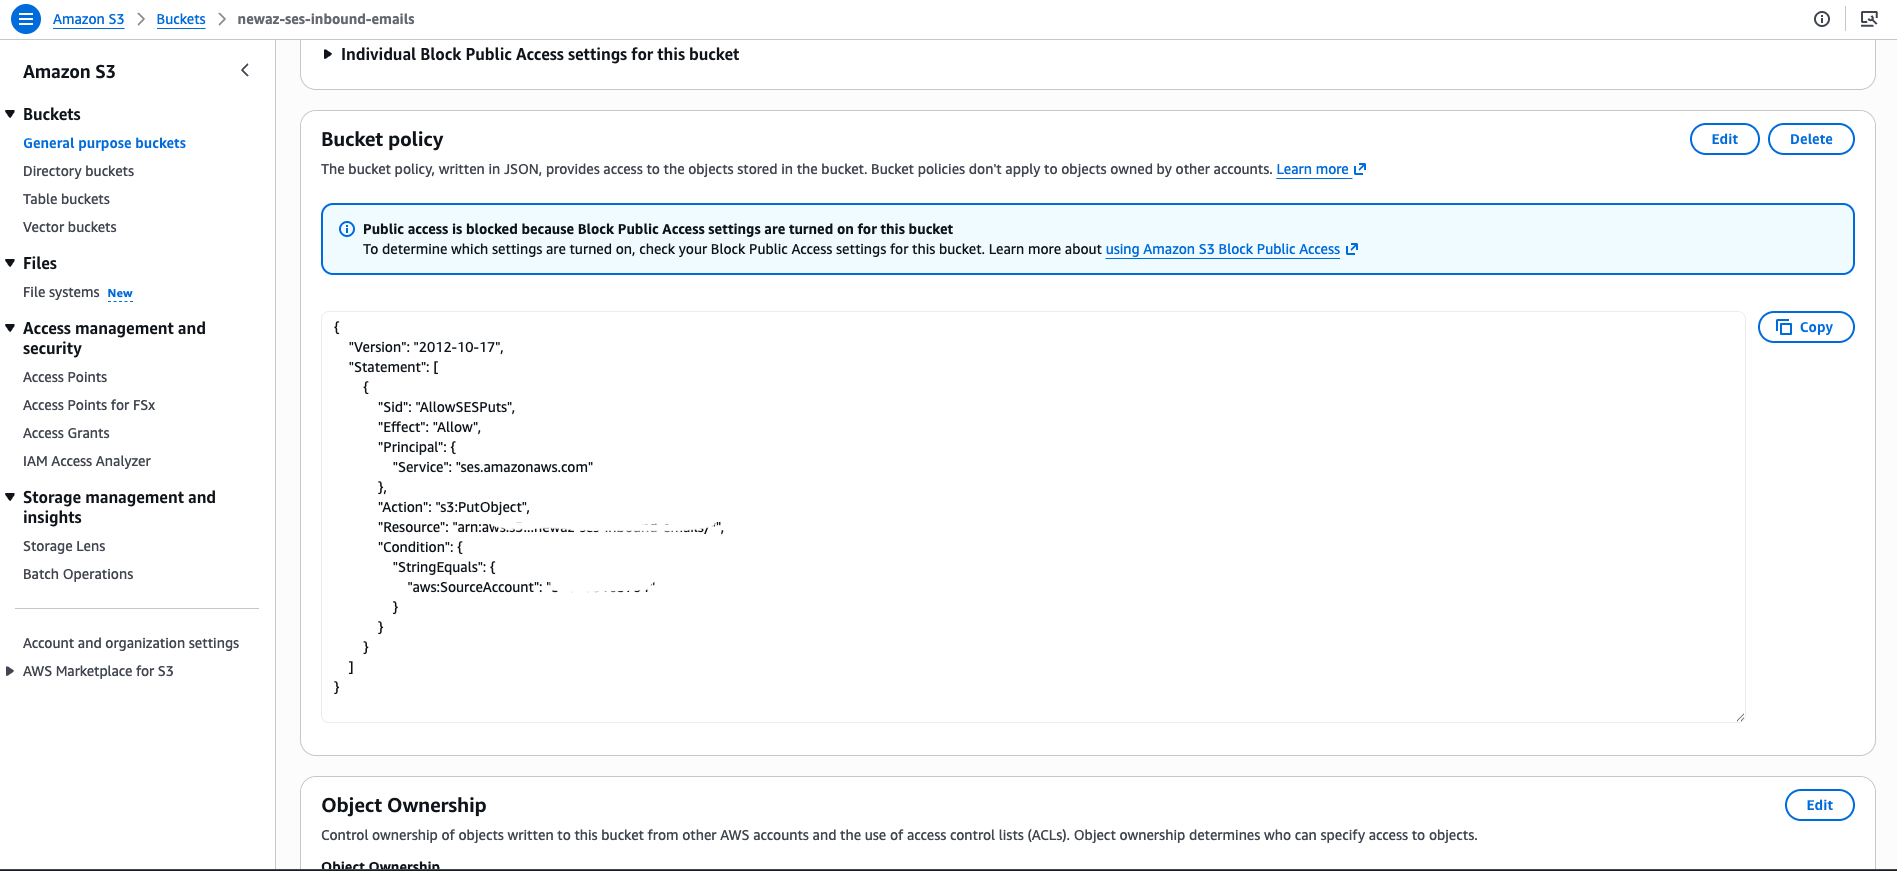
Here's the bucket policy you need to add:
{
  "Version": "2012-10-17",
  "Statement": [
    {
      "Sid": "AllowSESPuts",
      "Effect": "Allow",
      "Principal": {
        "Service": "ses.amazonaws.com"
      },
      "Action": "s3:PutObject",
      "Resource": "arn:aws:s3:::<s3-bucket-name>/*",
      "Condition": {
        "StringEquals": {
          "aws:SourceAccount": "<aws-account-id>"
        }
      }
    }
  ]
}
Replace <s3-bucket-name> with your bucket name and <aws-account-id> with your actual AWS account ID (you can find it in the AWS console top-right corner under your account name).
Why this policy? It lets SES put objects (emails) into your bucket, but only if the request comes from your AWS account. Without this, SES can't save emails to S3.
Step 4: Create IAM Policy and Role for Lambda
Lambda needs permissions to read emails from S3, send emails via SES, and write logs to CloudWatch. We'll create an IAM policy and role for this.
Go to the IAM console and create a new policy:
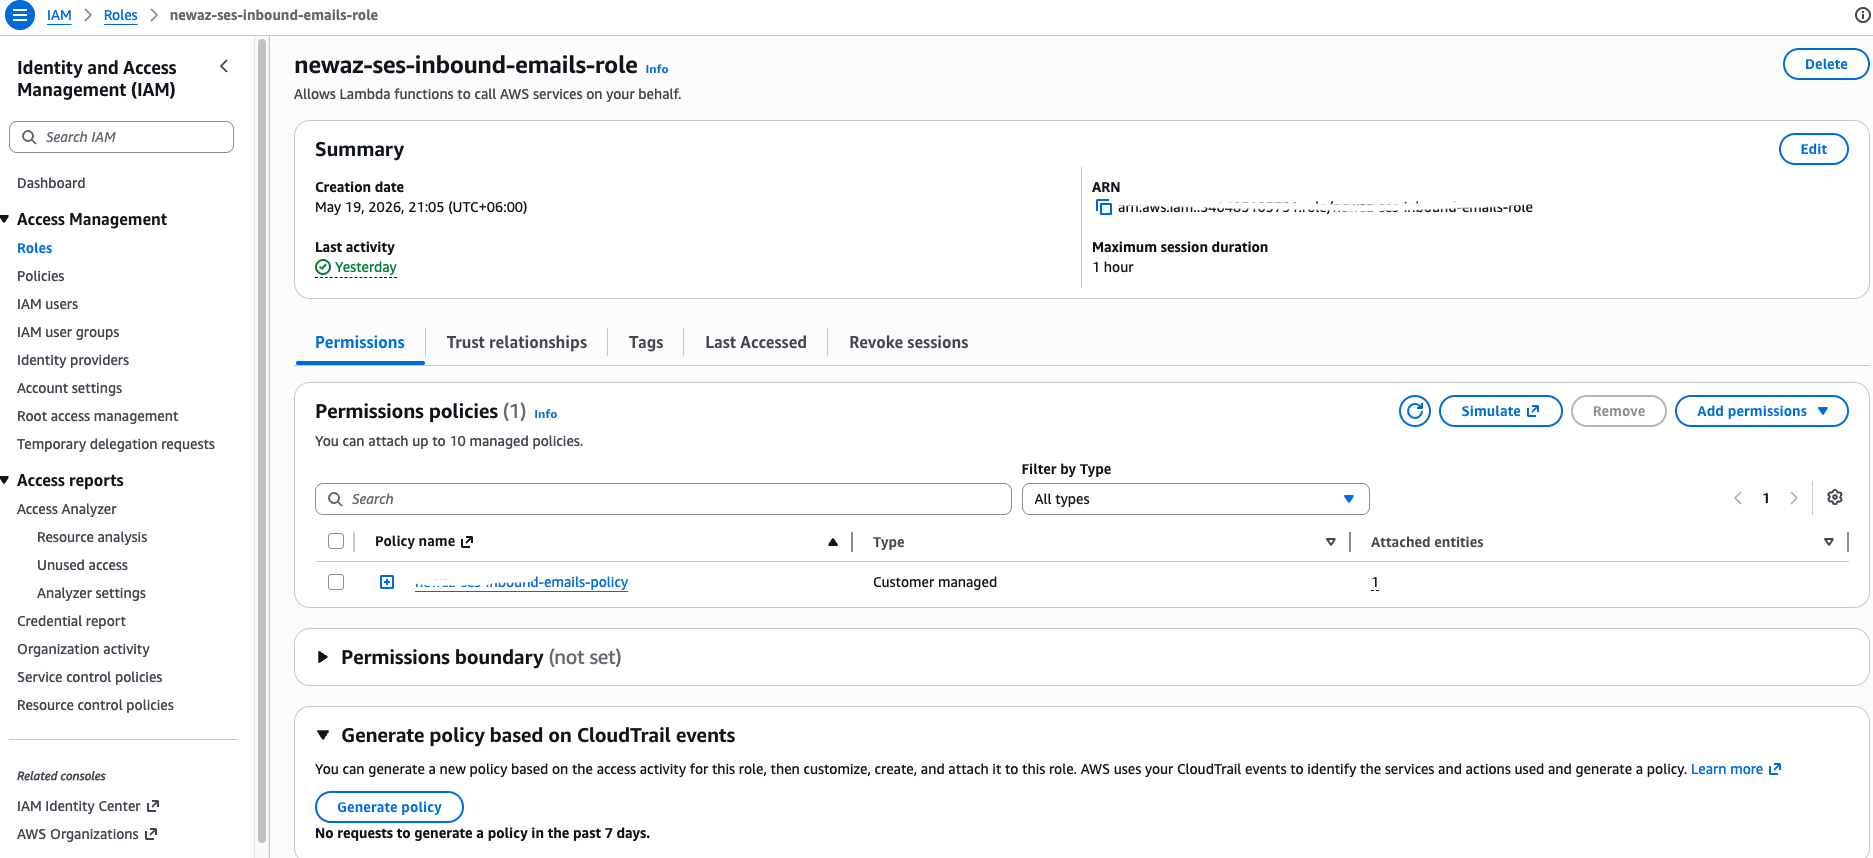
Use this JSON policy:
{
  "Version": "2012-10-17",
  "Statement": [
    {
      "Sid": "VisualEditor0",
      "Effect": "Allow",
      "Action": [
        "logs:CreateLogStream",
        "logs:CreateLogGroup",
        "logs:PutLogEvents"
      ],
      "Resource": "*"
    },
    {
      "Sid": "VisualEditor1",
      "Effect": "Allow",
      "Action": [
        "s3:GetObject",
        "ses:SendRawEmail"
      ],
      "Resource": [
        "arn:aws:s3:::<s3-bucket-name>/*",
        "arn:aws:ses:<your-region>:<aws-account-id>:identity/*"
      ]
    }
  ]
}
Replace the placeholders with your actual values. Here's what each permission does:
- logs:CreateLogStream, logs:CreateLogGroup, logs:PutLogEvents — Lets Lambda write to CloudWatch for monitoring
- s3:GetObject — Lets Lambda read emails from your S3 bucket
- ses:SendRawEmail — Lets Lambda forward emails via SES
After creating the policy, create a new IAM role:
- Go to Roles > Create role
- Select AWS service > Lambda
- Attach the policy you just created
- Name the role something like
SES-Email-Forwarder-Role
Step 5: Create Lambda Function for Email Forwarding
Now for the fun part. Go to the AWS Lambda console and create a new function:
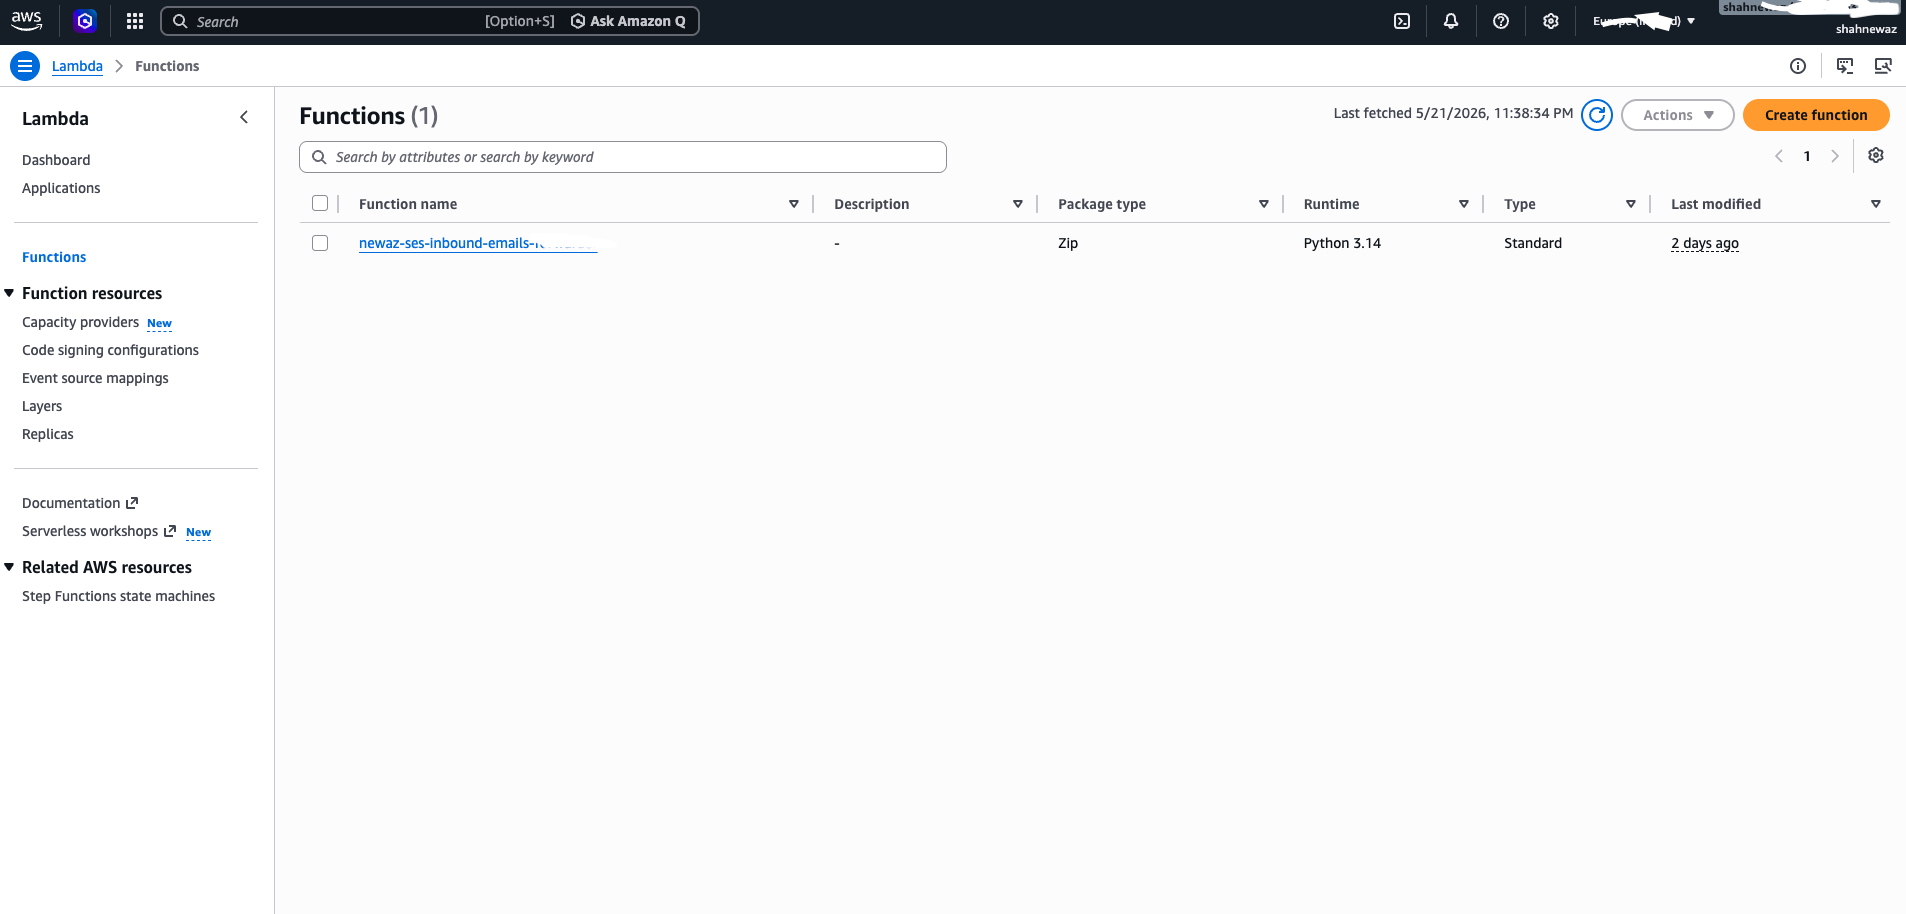
Create a function with these settings:
- Function name:
SES-Email-Forwarder - Runtime: Python 3.9 or later
- Execution role: Use the role you created in Step 4
Once created, replace the default code with the Lambda function from this gist: Lambda Function Code
Here's what the code does:
get_message_from_s3()— Retrieves the email from your S3 bucket using the message IDcreate_message()— Builds a new email with the original attached as a.emlfilesend_email()— Sends the forwarded email via SESlambda_handler()— Entry point that ties everything together
Under Basic settings, set the timeout to 30 seconds. The default 3 seconds might not be enough if the email is large.
Step 6: Configure Lambda Environment Variables
Lambda needs to know where to find the emails and where to send them. Go to your Lambda function's Configuration tab > Environment variables:
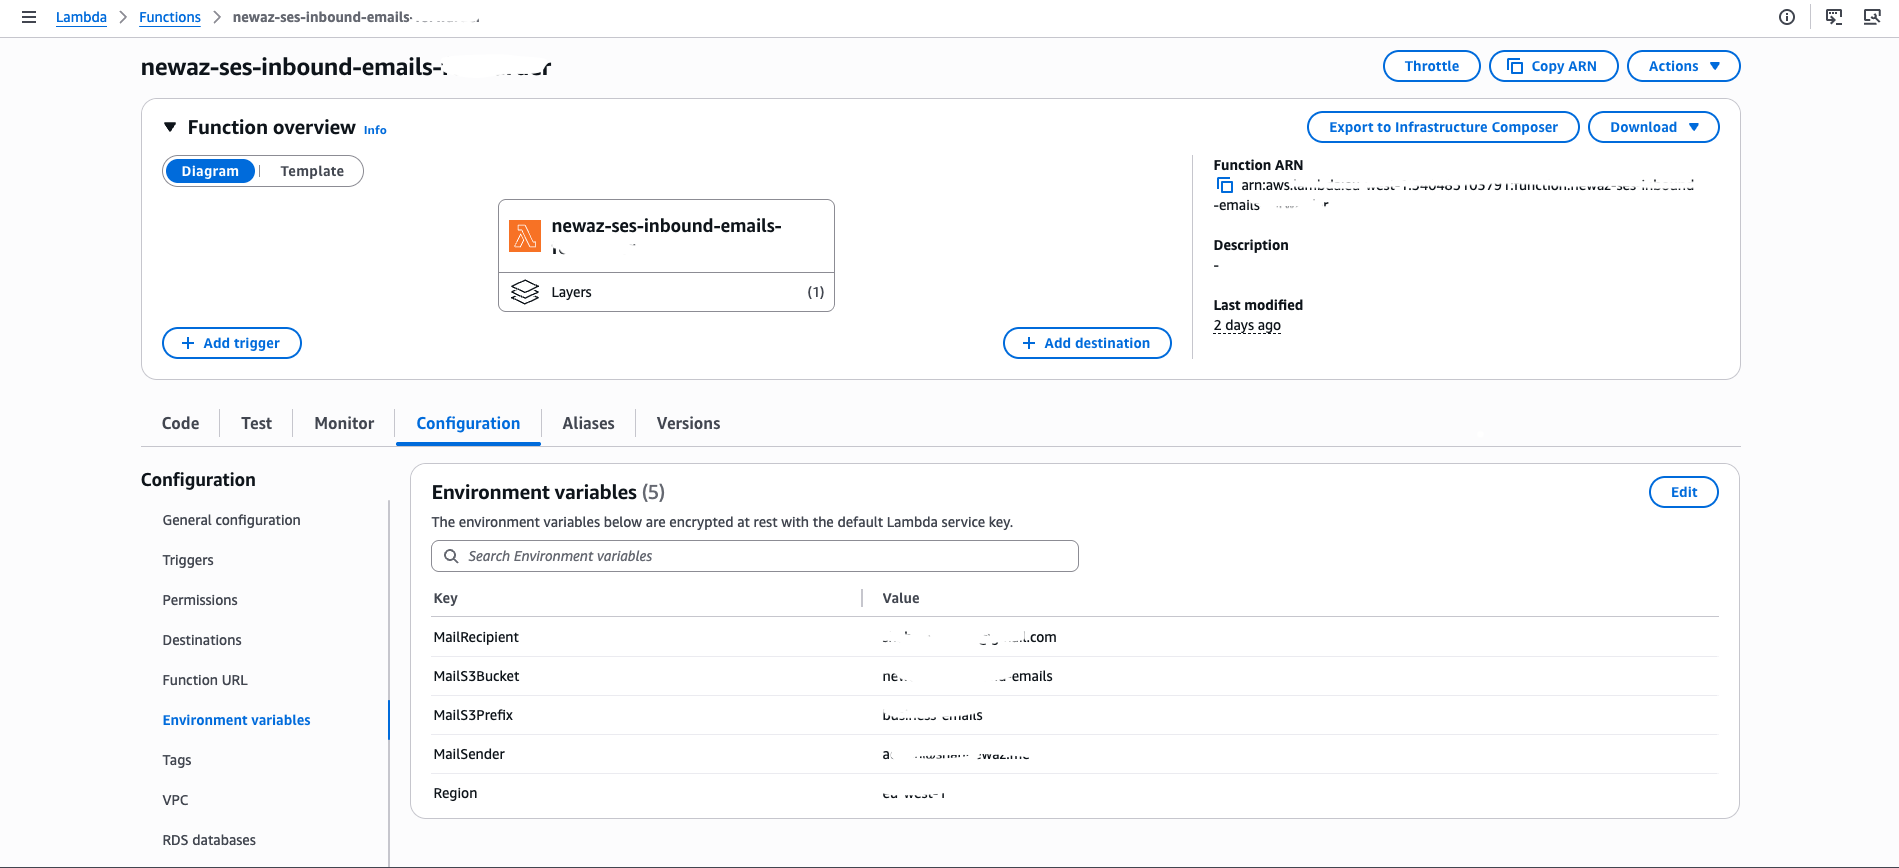
Add these environment variables:
- MailS3Bucket —
<s3-bucket-name>— Your S3 bucket name - MailS3Prefix —
emails— Folder path in bucket (optional, leave empty if not using) - MailSender —
noreply@yourdomain.com— Verified sender email address - MailRecipient —
yourname@gmail.com— Where to forward emails - Region —
<your-region>— Your AWS region
Important: The
MailSendermust be a verified identity in SES. Use your domain email likenoreply@yourdomain.comorhello@yourdomain.com.
Step 7: Create Email Receiving Rule
Now we need to tell SES what to do when an email arrives. Go to the SES console > Email receiving > Create rule:
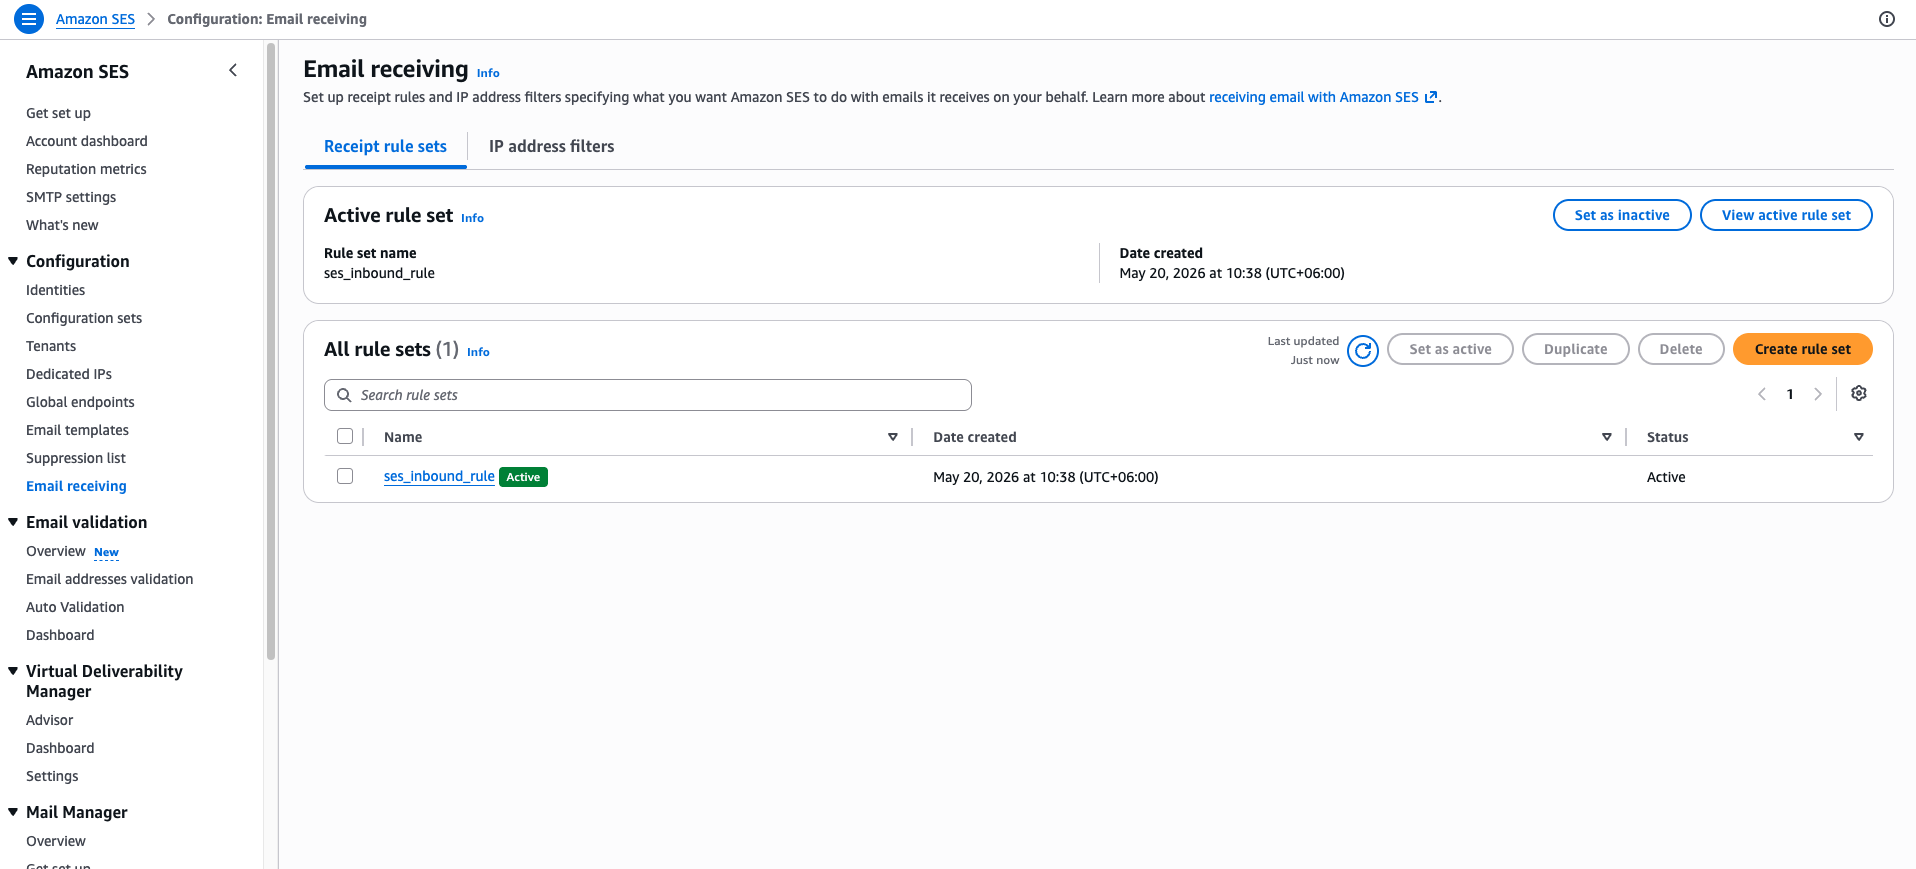
Create a Rule set first if you don't have one, then add a rule with these actions:
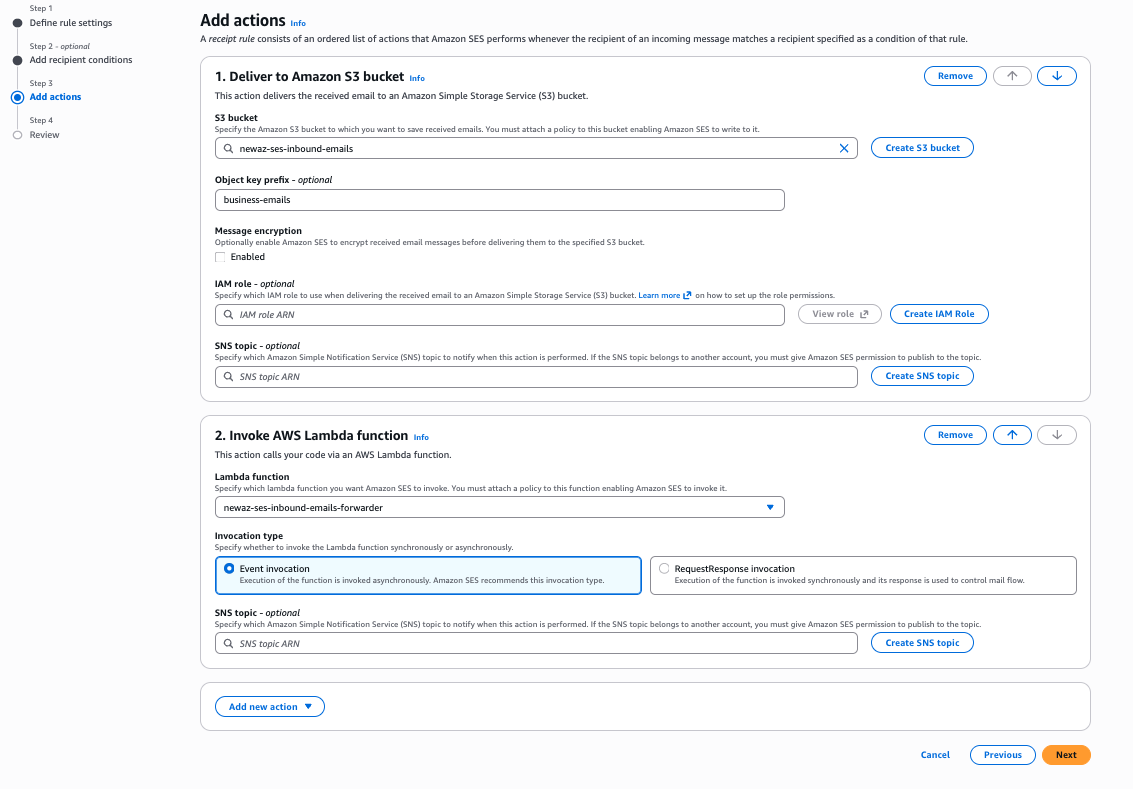
The rule needs two actions in this order:
- S3 action — Store the email in your S3 bucket
- Lambda action — Trigger your Lambda function to forward the email
For the recipients, you can either:
- Add specific addresses like
hello@yourdomain.com - Use a catch-all pattern to receive all emails to your domain
Note: Make sure the rule set is active. SES only processes emails using the active rule set.
Before testing, verify the 3 prerequisites for SES email receiving are done:
- Domain is verified in SES
- MX record points to SES inbound endpoint
- Receipt rule is active with S3 and Lambda actions
Step 8: Test Email Receiving
Time to test! Send an email to your domain address (like hello@yourdomain.com). You can use SendTestEmail.com to send a test email if you don't have another email account handy.
After sending:
- Check your S3 bucket — the email should be stored there
- Check your Gmail (or wherever you're forwarding) — you should receive the forwarded email
- Check CloudWatch logs if something doesn't work
If the email doesn't arrive, don't panic. We'll cover troubleshooting in the CloudWatch section.
Part 2: Sending Emails
Now that receiving is working, let's set up sending. We'll configure Gmail to send emails that appear to come from your domain.
Step 9: Set Up SMTP Credentials
Go to the SES console > SMTP settings:
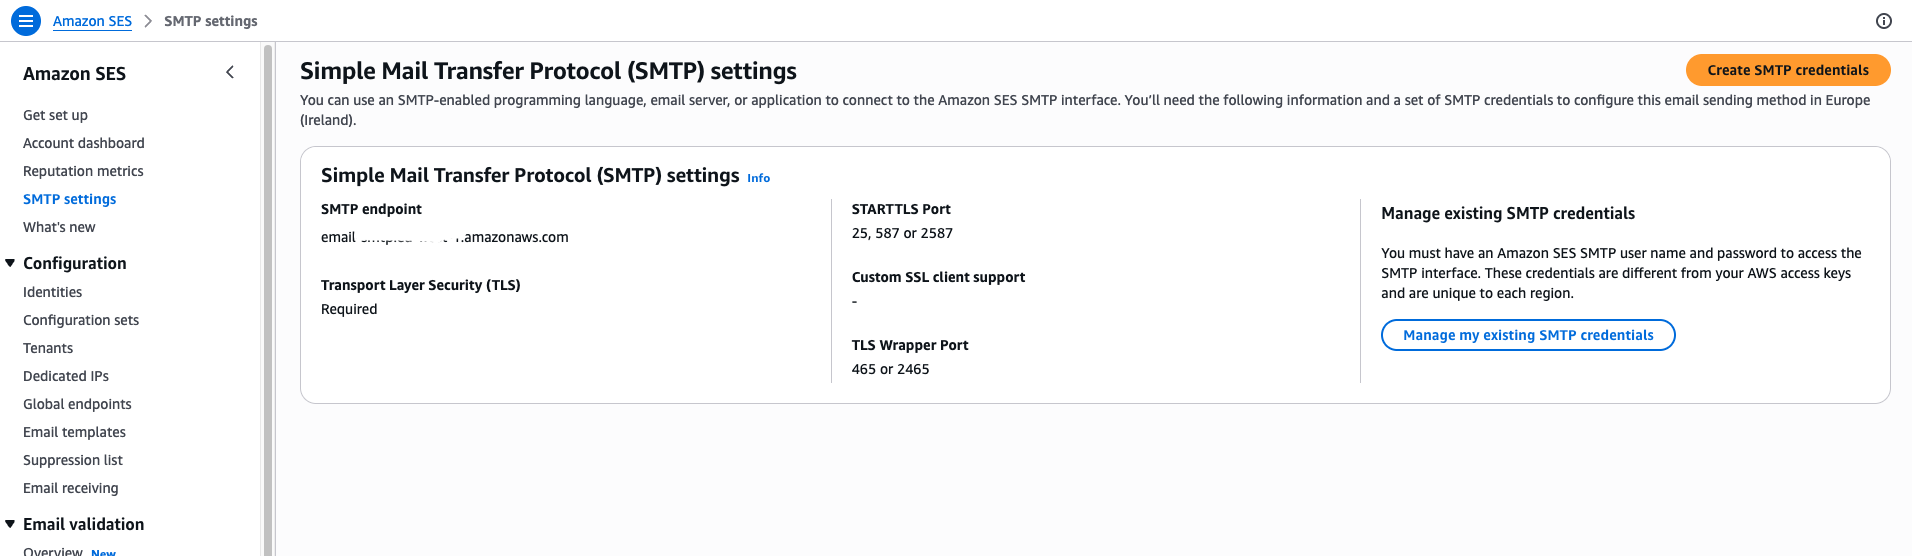
Click Create SMTP credentials. AWS will generate a username and password. Save these — you'll need them for Gmail configuration.
Note down these values:
- SMTP endpoint:
email-smtp.<your-region>.amazonaws.com(varies by region) - Port: 587 (TLS) or 465 (SSL)
- Username: Generated by AWS
- Password: Generated by AWS
Pro tip: SMTP credentials are different from your IAM user credentials. Don't confuse them.
Step 10: Configure Gmail to Send from SES
Open Gmail and go to Settings > Accounts and Imports > Add another email address:
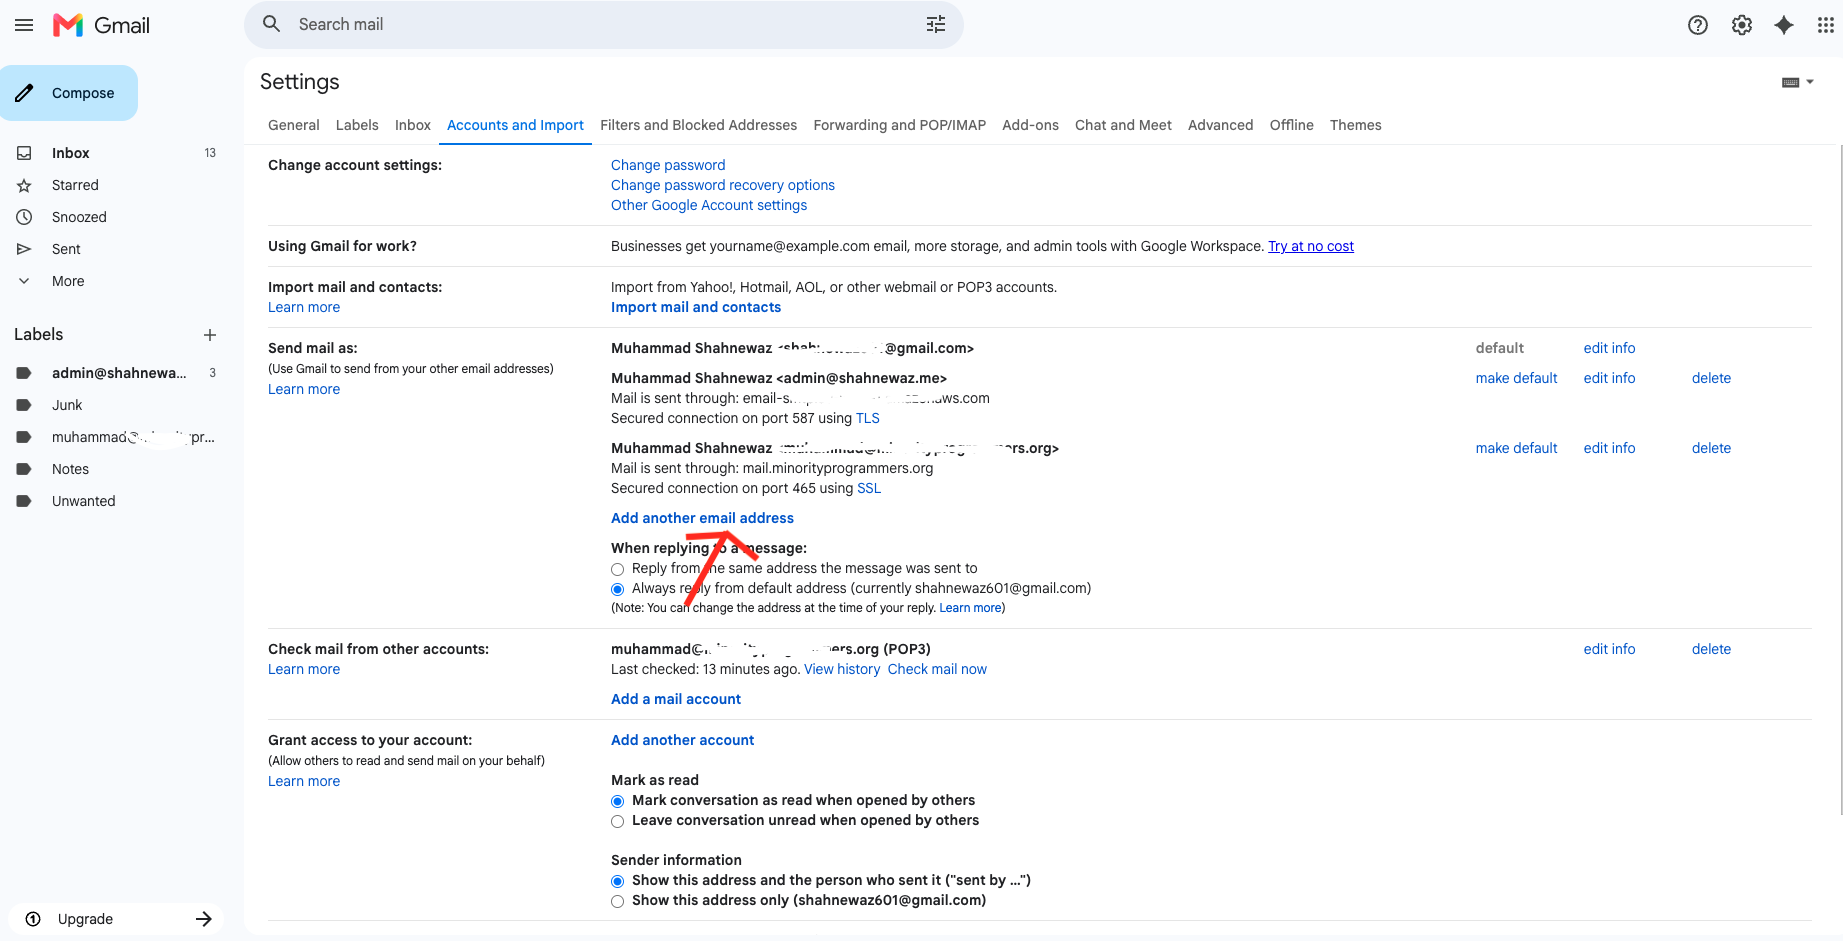
Fill in the SMTP settings:
- SMTP Server —
email-smtp.<your-region>.amazonaws.com - Port — 587
- Username — Your SMTP username from Step 9
- Password — Your SMTP password from Step 9
- Secured connection — TLS
Gmail will send a verification email to your domain address. Since we already set up email receiving, that verification email should arrive in your Gmail inbox (forwarded by Lambda). Click the verification link, and you're done.
Now when you compose a new email in Gmail, you can select your domain address as the "From" address.
Step 11: Sandbox Email Verification
If you're still in the SES sandbox (which you are by default), there's one limitation: you can only send emails to verified identities.
That means if you want to test sending from hello@yourdomain.com to someone@example.com, the recipient someone@example.com must also be verified in SES.
To verify a recipient:
- Go to SES console > Identities > Create identity
- Choose Email address
- Enter the recipient's email
- They'll receive a verification link
Once verified, you can send test emails between your verified identities.
Sandbox is fine for testing. But if you want to send emails to anyone (not just verified addresses), you need production access.
Part 3: Operations & Monitoring
Keeping things running smoothly and watching for issues.
Monitoring with CloudWatch
If emails aren't being forwarded, CloudWatch is where you look. Go to your Lambda function > Monitor tab > View logs in CloudWatch:
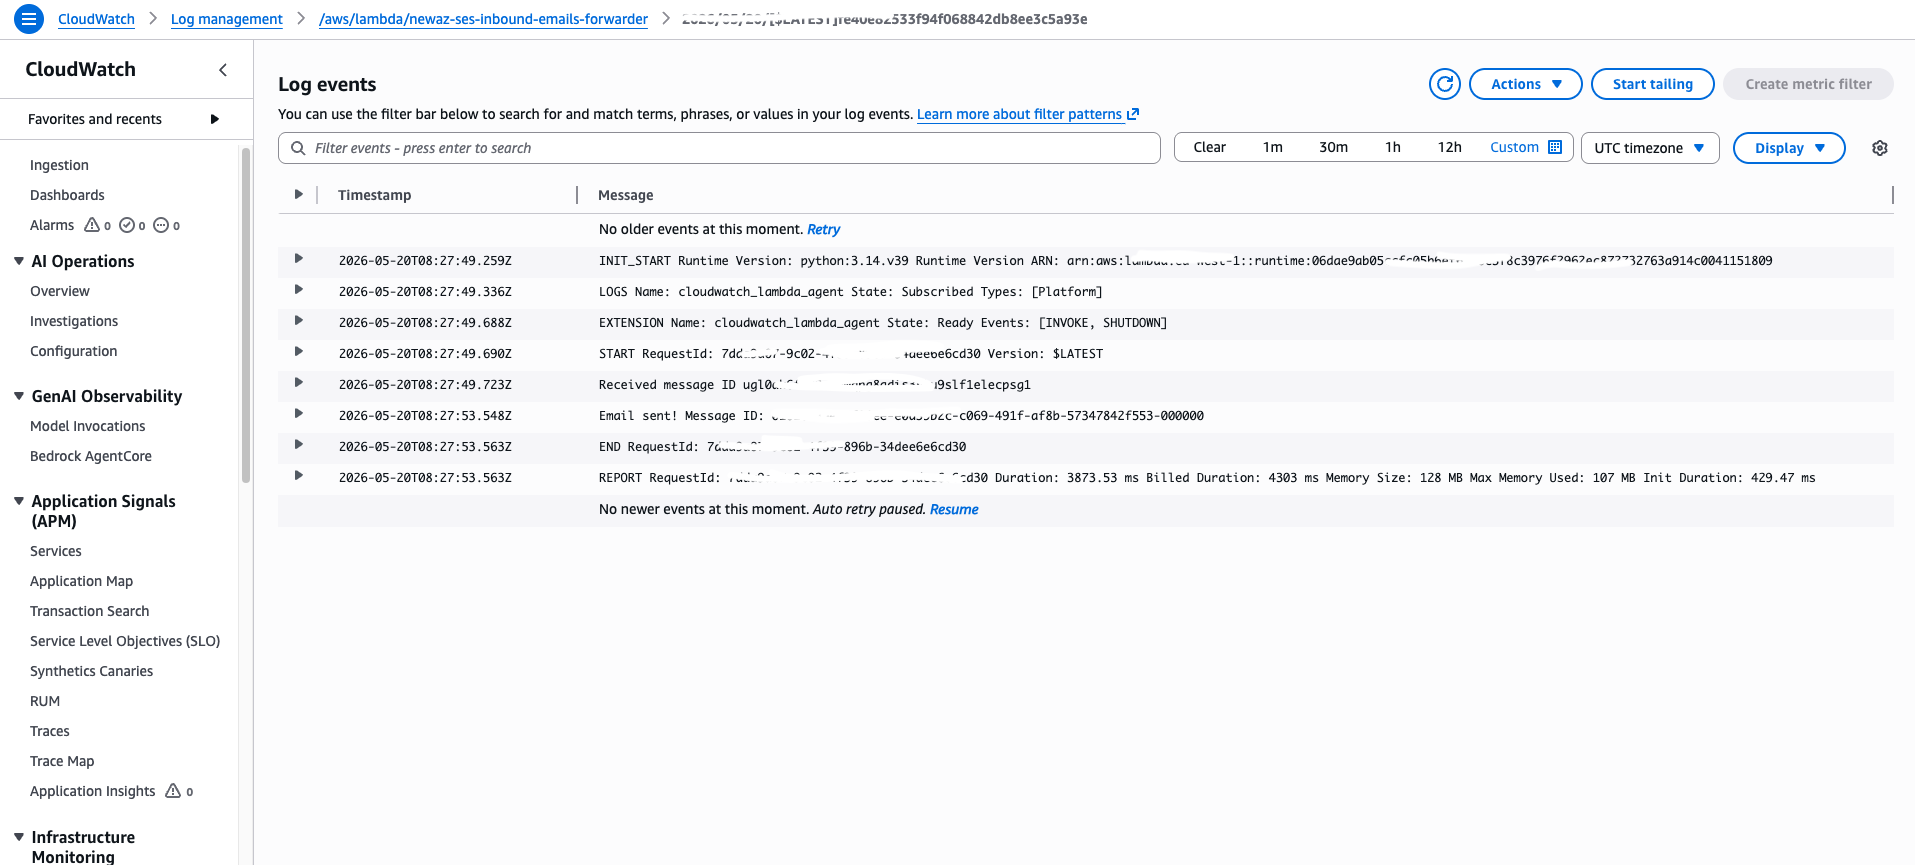
CloudWatch logs show you:
- Whether Lambda was triggered
- If it successfully read the email from S3
- If SES sent the forwarded email
- Any errors that occurred
Common issues to check:
- Access Denied — Your IAM role doesn't have the right permissions
- Bucket not found — Wrong bucket name in environment variables
- Email not verified — The sender or recipient isn't verified in SES
- Timeout — Lambda is taking too long (increase timeout in settings)
Pro tip: Set up CloudWatch alarms to get notified when errors happen. You can trigger an SNS notification or email when a Lambda error occurs.
S3 Lifecycle Rules for Cost Management
Emails stored in S3 add up over time. If you're receiving hundreds of emails a day, storage costs can creep up. The good news is you can set up lifecycle rules to automatically delete old emails.
Go to your S3 bucket > Management tab > Create lifecycle rule:
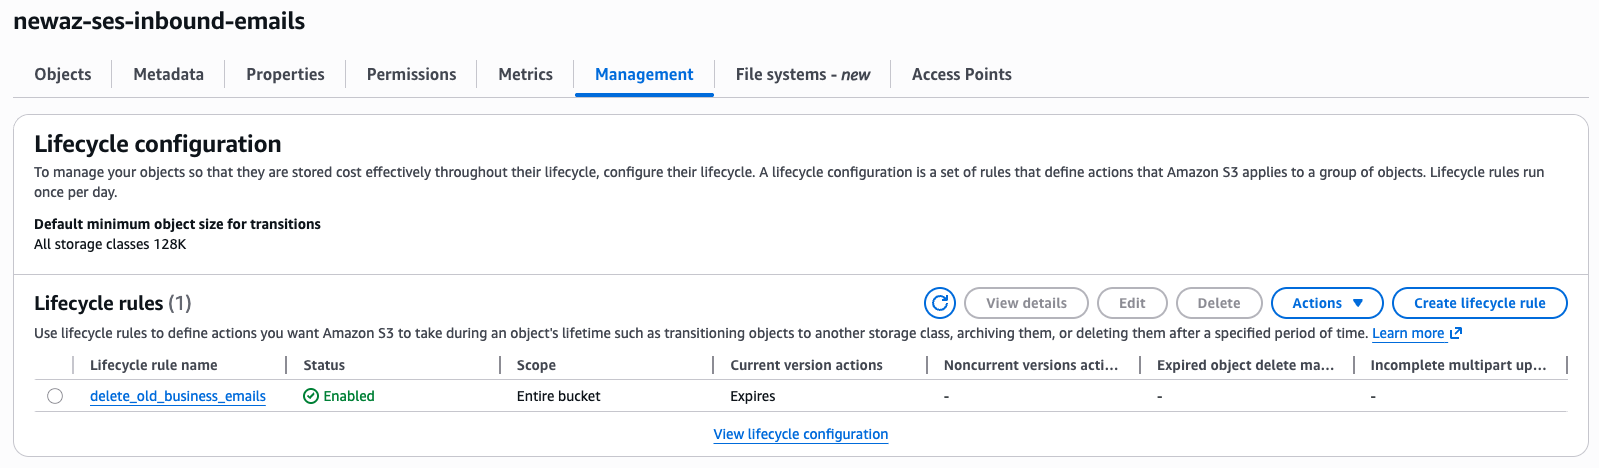
Create a rule like:
- Rule name:
Delete-old-emails - Scope: Apply to all objects
- Action: Permanently delete objects
- Days after object creation: 30 (or 90, depending on your needs)
This way, emails are automatically purged after your chosen retention period. You're not paying for storage you don't need.
Cost note: S3 storage is cheap, but not free. At $0.023 per GB per month, storing 1,000 emails of 2KB each costs less than a cent. But it adds up if you're storing thousands of large emails with attachments.
Part 4: Going to Production
When you're ready to go live and remove sandbox restrictions.
Request Production Access
When you're ready to go live, you need to request production access. This removes the sandbox restrictions and lets you send emails to anyone, not just verified addresses.
Go to the SES console > Account dashboard > Request production access:
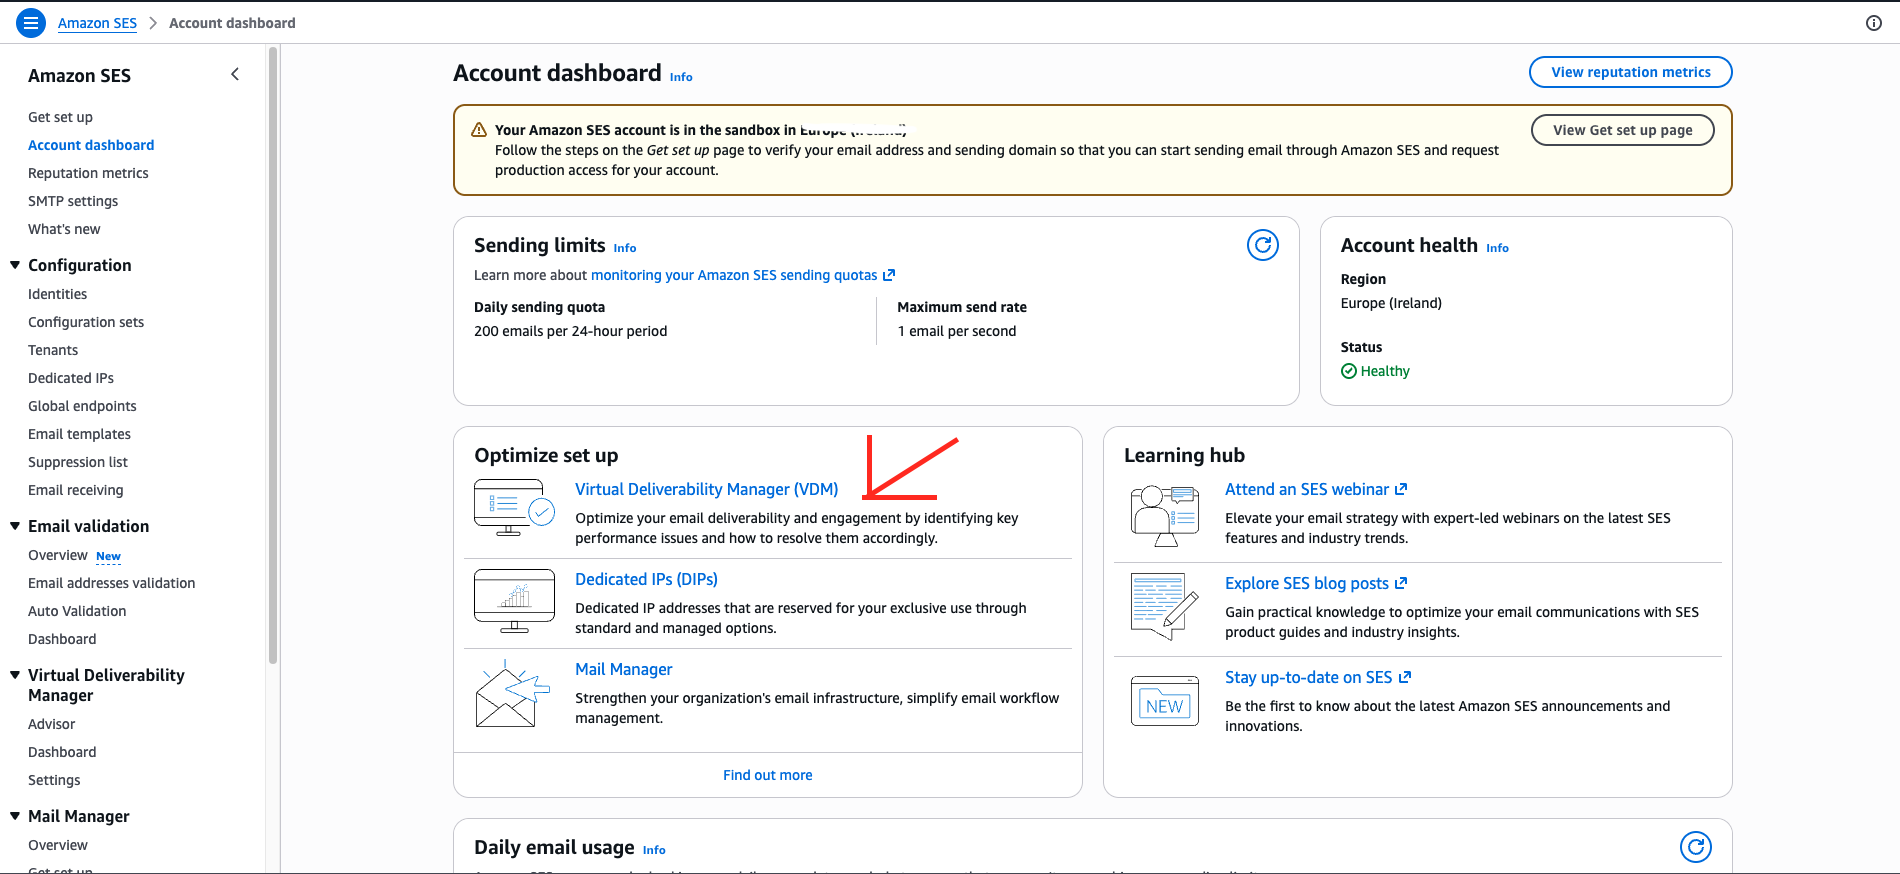
AWS will ask you to describe:
- How you plan to use SES
- What types of emails you'll send (transactional, marketing, etc.)
- How you handle bounces and complaints
Be honest and specific. AWS reviews these requests manually, and they want to know you're not going to spam people. Most legitimate use cases get approved within 24-48 hours.
Production access is per region. If you request production access in one region (e.g.,
us-east-1), it only applies to that region. You'd need to request again for another region (e.g.,eu-west-1).
AWS CloudShell Alternative
If you prefer the command line, you can do most of this setup using AWS CloudShell. It's a browser-based terminal that comes with the AWS CLI pre-installed.
For a walkthrough of CLI-based setup, check out the AWS CloudShell Workshop.
We won't cover the full CLI tutorial here, but CloudShell is handy if you're comfortable with the terminal and want to automate things.
Conclusion
That's it! You've set up a complete email system using AWS SES:
- Receive emails on your domain and forward them to your personal email
- Send emails from Gmail that appear to come from your domain
- Monitor everything with CloudWatch
- Manage costs with S3 lifecycle rules
The whole setup costs next to nothing for low-volume use. SES charges $0.10 per 1,000 emails, S3 storage is pennies, and Lambda has a generous free tier.
If you run into issues, check CloudWatch logs first. Most problems are either permission-related (IAM policy) or verification-related (identities not verified).
For more details, check out these AWS docs:
Happy emailing!
Further reading: